2012年7月24日 星期二

[MySQL]left, right, inner, outer join 使用方法


表格 test1 資料表
2 (by appleboy46)
表格 test2 資料表
1 (by appleboy46)

首先大概是了解 inner 跟 outer 的差別,初學者大概都會使用 inner 這也是我們常常在用的 SQL,inner 就是 join 兩個資料表只顯示匹對的資料,另外一種 outer 就是不管是否有匹對,都會將資料顯示出來,又分為 LEFT, RIGHT, FULL join。
join 總共分為六種
Inner Join
Natural Join
Left Outer Join
Right Outer Join
Full Outer Join
Cross Join
1. Inner Join
--
-- 這算是最普通的 join 方法
--
SELECT a.*, b.* FROM `test1` AS a, `test2` AS b WHERE a.id = b.id
2. Natural Join
--
-- 利用兩資料表相同欄位,自動連接上
SELECT a.*, b.* FROM `test1` AS a NATURAL JOIN `test2` AS b
3. Left, Right join
--
-- 這兩個其實是相同的,left join 就是顯示左邊表格所有資料,如果匹對沒有的話,就是顯示 NULL
-- right 則是相反
SELECT a.*, b.* FROM `test1` AS a LEFT JOIN `test2` AS b ON a.id = b.id
4. Full Outer Join
這個可以利用 SQL UNION 處理掉,這只是聯集 Left 跟 Right
5. Cross Join
在 MySQL 語法裡面,它相同於 INNER Join,但是在標準 SQL 底下,它們不盡相同
SELECT * FROM t1 LEFT JOIN (t2, t3, t4)
                 ON (t2.a=t1.AND t3.b=t1.AND t4.c=t1.c)
同等於
SELECT * FROM t1 LEFT JOIN (t2 CROSS JOIN t3 CROSS JOIN t4)
                 ON (t2.a=t1.AND t3.b=t1.AND t4.c=t1.c)
取一段 MySQL 官網的文字:
In MySQL, CROSS JOIN is a syntactic equivalent to INNER JOIN (they can replace each other). In standard SQL, they are not equivalent. INNER JOIN is used with an ON clause, CROSS JOIN is used otherwise.

2012年7月20日 星期五

自動化測試中FindWindow與FindWindowEx的使用示例


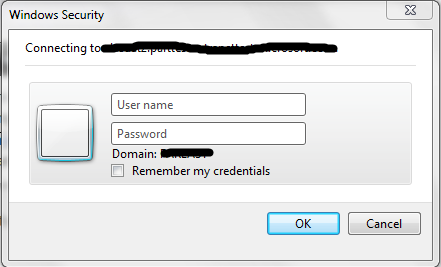
昨天在做一個網頁測試時,它會彈出一個對話框(如下圖)對用戶進行一個認證。
Capture

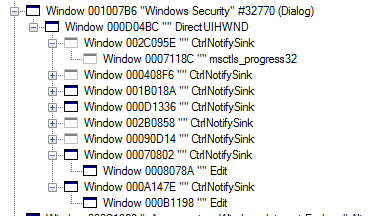
使用Spy++偵測這個對話框的結構如下,我們看到兩個Edit就在最後兩個節點上。
Capture1

我們現在就可以利用FindWindow以及FindWindowEx這兩個函數來幫我們找到這個窗體及窗體上所有的控件,然後幫我們完成自動化測試。
下面這個程序就是幫我們自動輸入用戶名與密碼。
複製代碼
using System;
using System.Collections.Generic;
using System.Linq;
using System.Text;
using System.Runtime.InteropServices;
using System.Threading;

namespace ConsoleApplication79
{
    class Program
    {
        [DllImport("user32.dll", EntryPoint = "FindWindow", CharSet = CharSet.Auto)]
        private extern static IntPtr FindWindow(string classname, string captionName);

        [DllImport("user32.dll", EntryPoint = "FindWindowEx", CharSet = CharSet.Auto)]
        private extern static IntPtr FindWindowEx(IntPtr parent,IntPtr child,string classname, string captionName);

        [DllImport("user32.dll")]
        static extern IntPtr SendMessage(IntPtr hWnd, UInt32 Msg, IntPtr wParam, [MarshalAs(UnmanagedType.LPStr)] string lParam);

        [DllImport("user32.dll")]
        [return: MarshalAs(UnmanagedType.Bool)]
        static extern bool SetForegroundWindow(IntPtr hWnd);

        static void Main(string[] args)
        {

            IntPtr mwh1 = IntPtr.Zero;

            while (mwh1 == IntPtr.Zero)
            {
                Thread.Sleep(1000);
                mwh1 = FindWindow(null, "Windows Security");
            }

            IntPtr panel = FindWindowEx(mwh1, IntPtr.Zero, "DirectUIHWND", null);

            IntPtr CtrlNotifySink = IntPtr.Zero;

            CtrlNotifySink = FindWindowEx(panel, IntPtr.Zero, "CtrlNotifySink", null);

            for (int i = 1; i < 7; i++)
            {
                CtrlNotifySink = FindWindowEx(panel, CtrlNotifySink, "CtrlNotifySink", null);
            }

            IntPtr editor = FindWindowEx(CtrlNotifySink, IntPtr.Zero, null, null);

            uint WM_SETTEXT = 0xC;

            SendMessage(editor, WM_SETTEXT, IntPtr.Zero, "username");

            CtrlNotifySink = FindWindowEx(panel, CtrlNotifySink, "CtrlNotifySink", null);
            editor = FindWindowEx(CtrlNotifySink, IntPtr.Zero, null, null);

            SendMessage(editor, WM_SETTEXT, IntPtr.Zero, "password");
        }
    }
}
 
複製代碼

主要注意的一點就是代碼裡使用FindWindowEx循環查找子控件,因為這些控件都是具有相同類名的。
輸入好信息後,查找OK那個Button也差不多是這樣的方法重複。

下面介紹一下更無恥的方法哈:
複製代碼
static void Main(string[] args)
        {

            IntPtr mwh1 = IntPtr.Zero;

            while (mwh1 == IntPtr.Zero)
            {
                Thread.Sleep(1000);
                mwh1 = FindWindow(null, "Windows Security");
            }


            SetForegroundWindow(mwh1);
            System.Windows.Forms.SendKeys.SendWait("username");
            System.Windows.Forms.SendKeys.SendWait("{TAB}");
            System.Windows.Forms.SendKeys.SendWait("password");
            System.Windows.Forms.SendKeys.SendWait("{TAB}");
            System.Windows.Forms.SendKeys.SendWait("{TAB}");
            System.Windows.Forms.SendKeys.SendWait("{ENTER}");

            
        }
 
複製代碼

呵呵!其實就是將需要處理的窗口激活,用SendKey處理,這是我同事想出來的,記錄一下!
可能還有更多更好的方法,希望各位多多指點了!

2012年7月13日 星期五

繁簡轉換 好用的類別庫 - Microsoft Visual Studio International Pack


由於最近案子的需求,需要進行繁簡轉換這個棘手的問題,也因此意外的發現了個好用的類別庫:Microsoft Visual Studio International Pack,這是一套國產的類別庫,用途是幫助 .NET 程式開發人員建立全球化的應用程式,而其中提供了一組好用的類別庫就是「繁簡轉換」功能的「中文繁簡轉換類別庫」拉。

使用方法也很簡單,只需在使用到的專案裡加入參考ChineseConverter.dll,再引用其命名空間即可。
DLL參考位置(預設安裝的情況下): C:\Program Files\Microsoft Visual Studio International Pack\Traditional Chinese to Simplified Chinese Conversion Library and Add-In Tool\ChineseConverter.dll
引用命名空間: using Microsoft.International.Converters.TraditionalChineseToSimplifiedConverter;

為了快速顯示效果,寫了個小程式來展示一下: 程式說明:透過 [轉繁體] 、[轉簡體] 兩顆按鈕來轉換已輸入的字串成繁體字或簡體字。

程式快照:
程式畫面:轉簡體:轉繁體:以下為原始碼:
using System.Drawing;
using System.Linq;
using System.Text;
using System.Windows.Forms;
using Microsoft.International.Converters.TraditionalChineseToSimplifiedConverter;

namespace ChineseConvert
{
    public partial class FormMain : Form
    {
        public FormMain()
        {
            InitializeComponent();
        }

        //預先設定來源字串
        private void FormMain_Load(object sender, EventArgs e)
        {
            this.txbSourdeString.Text = "資料來源";
        }

        //轉繁體按鈕
        private void btnCT_Click(object sender, EventArgs e)
        {
            this.txbConvertString.Text = Convert(this.txbSourdeString.Text, "Big5");
        }

        //轉簡體按鈕
        private void btnCS_Click(object sender, EventArgs e)
        {
            this.txbConvertString.Text = Convert(this.txbSourdeString.Text, "GB2312");
        }

        //繁簡轉換Funtion,參數 Language 為 Big5 則轉繁體、GB2312 則轉簡體,其他狀況則輸出原字串
        private string Convert(string SourceString, string Language)
        {
            string newString = string.Empty;
            switch (Language)
            {
                case "Big5":
                    newString= ChineseConverter.Convert(SourceString, ChineseConversionDirection.SimplifiedToTraditional);
                    break;
                case "GB2312":
                    newString= ChineseConverter.Convert(SourceString, ChineseConversionDirection.TraditionalToSimplified);
                    break;
                default:
                    newString = SourceString;
                    break;
            }
            return newString;
        }
    }
}

2012年7月9日 星期一

DLL入口函數DllMain


  1. DllMain簡介
        跟exe有個main或者WinMain入口函數一樣,DLL也有一個入口函數,就是DllMain。以「DllMain」為關鍵字,來看看MSDN幫助文檔怎麼介紹這個函數的:The DllMain function is an optional method of entry into a dynamic-link library (DLL)。(翻譯:DllMain函數是DLL文件的入口函數,它是可選的。)這句話很重要,很多初學者可能都認為一個動態鏈接庫肯定要有DllMain函數。其實不然,像很多僅僅包含資源信息的DLL是沒有DllMain函數的。
  2. 何時調用DllMain
        系統是在什麼時候調用DllMain函數的呢?靜態鏈接或動態鏈接時調用LoadLibrary和FreeLibrary都會調用DllMain函數。 DllMain的第二個參數fdwReason指明了系統調用Dll的原因,它可能是DLL_PROCESS_ATTACH、 DLL_PROCESS_DETACH、DLL_THREAD_ATTACH和DLL_THREAD_DETACH。
  3. 以下從這四種情況來分析系統何時調用了DllMain。
    (1) DLL_PROCESS_ATTACH
        大家都知道,一個程序要調用Dll裡的函數,首先要先把DLL文件映射到進程的地址空間。要把一個DLL文件映射到進程的地址空間,有兩種方法:靜態鏈接和動態鏈接的LoadLibrary或者LoadLibraryEx。
        當一個DLL文件被映射到進程的地址空間時,系統調用該DLL的DllMain函數,傳遞的fdwReason參數為 DLL_PROCESS_ATTACH。這種調用只會發生在第一次映射時。如果同一個進程後來為已經映射進來的DLL 再次調用LoadLibrary或者LoadLibraryEx,操作系統只會增加DLL的使用次數,它不會再用DLL_PROCESS_ATTACH調用DLL的DllMain函數。不同進程用LoadLibrary同一個DLL時,每個進程的第一次映射都會用DLL_PROCESS_ATTACH調用 DLL的DllMain函數。
        可參考DllMainTest的DLL_PROCESS_ATTACH_Test函數。
    (2) DLL_PROCESS_DETACH
        當DLL被從進程的地址空間解除映射時,系統調用了它的DllMain,傳遞的fdwReason
    值是DLL_PROCESS_DETACH。當DLL處理該值時,它應該執行進程相關的清理工作。
        那麼什麼時候DLL被從進程的地址空間解除映射呢?兩種情況:
           ◆FreeLibrary解除DLL映射(有幾個LoadLibrary,就要有幾個FreeLibrary)
           ◆進程結束而解除DLL映射,當然是在進程結束前還沒有這個解除DLL的映射的情況。(如果進程的終結是因為調用了TerminateProcess,系統就不會用 DLL_PROCESS_DETACH來調用DLL的DllMain函數。這就意味著DLL在進程結束前沒有機會執行任何清理工作。)
        注意:當用DLL_PROCESS_ATTACH調用DLL的DllMain函數時,如果返回FALSE,說明沒有初始化成功,系統仍會用DLL_PROCESS_DETACH調用DLL的DllMain函數。因此,必須確保沒有清理那些沒有成功初始化的東西。
        可參考DllMainTest的DLL_PROCESS_DETACH_Test函數。
    (3) DLL_THREAD_ATTACH
        當進程創建一線程時,系統查看當前映射到進程地址空間中的所有DLL文件映像,並用值DLL_THREAD_ATTACH調用DLL的DllMain函數。
        新創建的線程負責執行這次的DLL的DllMain函數,只有當所有的DLL都處理完這一通知後,系統才允許線程開始執行它的線程函數。
        注意跟DLL_PROCESS_ATTACH的區別,我們在前面說過,第n(n>=2)次以後地把DLL映像文件映射到進程的地址空間時,是不再用 DLL_PROCESS_ATTACH調用DllMain的。而DLL_THREAD_ATTACH不同,進程中的每次建立線程,都會用值 DLL_THREAD_ATTACH調用DllMain函數,哪怕是線程中建立線程也一樣。
    (4) DLL_THREAD_DETACH
        如果線程調用了ExitThread來結束線程(線程函數返回時,系統也會自動調用ExitThread),系統查看當前映射到進程空間中的所有DLL文件映像,並用DLL_THREAD_DETACH來調用DllMain函數,通知所有的DLL去執行線程級的清理工作。
        注意:如果線程的結束是因為系統中的一個線程調用了TerminateThread,系統就不會用值DLL_THREAD_DETACH來調用所有DLL的DllMain函數。

2012年7月5日 星期四

How can a 32-bit program detect that it is launched in a 64-bit Windows?


64-bit operating systems of the Windows family can execute 32-bit programs with the help of the WoW64(Windows in Windows 64) subsystem that emulates the 32-bit environment due to an additional layer between a 32-bit application and 64-bit Windows API.
A 32-bit program can find out if it is launched in WoW64 with the help of the IsWow64Process function. The program can get additional information about the processor through the GetNativeSystemInfo function.
Keep in mind that the IsWow64Process function is included only in 64-bit Windows versions. You can use the GetProcAddress and GetModuleHandle functions to know if the IsWow64Process function is present in the system and to access it. This is an example demonstrating a correct use of the IsWow64Process function (download the project):
#include "stdafx.h"

bool IsWow64()
{
  BOOL bIsWow64 = FALSE;

  typedef BOOL (APIENTRY *LPFN_ISWOW64PROCESS)
    (HANDLE, PBOOL);

  LPFN_ISWOW64PROCESS fnIsWow64Process;

  HMODULE module = GetModuleHandle(_T("kernel32"));
  const char funcName[] = "IsWow64Process";
  fnIsWow64Process = (LPFN_ISWOW64PROCESS)
    GetProcAddress(module, funcName);

  if(NULL != fnIsWow64Process)
  {
    if (!fnIsWow64Process(GetCurrentProcess(),
                          &bIsWow64))
      throw std::exception("Unknown error");
  }
  return bIsWow64 != FALSE;
}

void main()
{
  if (IsWow64())
    printf("The process is running under WOW64.\n");
  else
    printf("The process is not running under WOW64.\n");

  printf("\nPress Enter to continue...");
  getchar();
}

References

2012年7月3日 星期二

Use System Events To Protect Your Application Data


Introduction

If you’ve used the new MS Office products recently, you’ve noticed that Outlook, for instance, does not let you log off unless the application is closed. This is because Outlook does its data finalization when it closes and does not want cached data to be corrupted by a user logging off.
I recently worked on an application where we had to log streaming data which was cached for performance reasons, and then dumped the data to a file after certain criteria was met. The importance of the data mandated that we protect the collected data at all costs. It then struck me that it would be necessary to prevent the user from closing the application or shutting down the system while volatile data was being processed and resident in the cache.
The sample program presented here is not anywhere close to being a real production application, rather a simple program coded for the sole purpose of illustrating the concepts in this article. It presents a simple application that logs some random data (in a separate thread) and periodically writes cached data to a log file. If the user tries to log off, the application prompts the user with a choice to:
  • Save data and log off.
  • Don't save data and log off.
  • Cancel the user's logout or shutdown request, and continue.

About System Events

SystemEvents are events raised by, well…, the system. These are events that are raised in response to actions by the user that affect the operating environment. SystemEvents are not to be confused with Win32 system events that were kernel level events accessible to all programs. The events we are referring to here are those raised by theSystemEvents class in the Microsoft.Win32 namespace.
Events raised by the SystemEvents class are as follows:
  • DisplaySettingsChanged
    Occurs when the user changes the display settings.
  • EventsThreadShutdown
    Occurs before the thread that listens for system events is terminated. Delegates will be invoked on the events thread.
  • InstalledFontsChanged
    Occurs when the user adds fonts to or removes fonts from the system.
  • LowMemory
    Occurs when the system is running out of available RAM.
  • PaletteChanged
    Occurs when the user switches to an application that uses a different palette.
  • PowerModeChanged
    Occurs when the user suspends or resumes the system.
  • SessionEnded
    Occurs when the user is logging off or shutting down the system.
  • SessionEnding
    Occurs when the user is trying to log off or shutdown the system.
  • TimeChanged
    Occurs when the user changes the time on the system clock.
  • TimerElapsed
    Occurs when a Windows timer interval has expired.
  • UserPreferenceChanged
    Occurs when a user preference has changed.
  • UserPreferenceChanging
    Occurs when a user preference is changing.
Of the provided system events, the following are particularly useful to our application:
  • SessionEnding – Want to stop user from closing app with cached data.
  • LowMemory – Want to write cached data in hopes of reducing working set.
  • PowerModeChanged – Write cached data before going into standby mode.
In addition to these system events, we also want to trap the ApplicationExit event of the application we are running to make sure we clean up even when the user closes the window.

The Sample Program

Sample screenshot

Registering for events:
In the main form’s Load event handler, we register for the desired events. Here we make sure that we also handle the Close event for the form in addition to the system events to make sure the cached data gets written to the file.
private void Form1_Load(object sender, System.EventArgs e) {
  Application.ApplicationExit +=new EventHandler(Application_ApplicationExit);

  /* Register for system events to detect user trying 
     to log off or low memory condition */
  SystemEvents.SessionEnding +=new 
        SessionEndingEventHandler(SystemEvents_SessionEnding);
  SystemEvents.LowMemory +=new EventHandler(SystemEvents_LowMemory);
  SystemEvents.PowerModeChanged += new 
        PowerModeChangedEventHandler(SystemEvents_PowerModeChanged);

  /* can't stop what hasn't been started */
  button2.Enabled = false;

  /* The local log file */
  this.fileName = 
   Environment.GetFolderPath( Environment.SpecialFolder.LocalApplicationData ) 
   + "\\DumLogFile.bin";
  this.label1.Text = this.fileName;
}
When handling the SessionEnding event, we prompt the user with three choices. If the user chooses to cancel the logout, we simply set the Cancel flag of the SessionEndingEventArgs argument to false to cancel the logout. If the user chooses to logout, then we decide whether to write our cached data to the log or not and let the logout proceed.
private void SystemEvents_SessionEnding(object sender, SessionEndingEventArgs e) {
  /* Don't care if user logs out while no logging going on */
  if( logThread == null ) return;
  /* User is trying to log out. Prompt the user with choices */
  DialogResult dr = MessageBox.Show( "Critical Data In Cache!\n"+
    "Click Yes to save data and log out\n"+ 
    "Click No to logout without saving data\n"+ 
    "Click Cancel to cancel logout and manually stop the application", 
    "Data Logging In Progress", 
    MessageBoxButtons.YesNoCancel, MessageBoxIcon.Exclamation );

  /* User promises to be good and manually stop the app from now on(yeah right) */
  /* Cancel the logout request, app continues */
  if( dr == DialogResult.Cancel ){
    e.Cancel = true;
  }

  /* Good user! Santa will bring lots of data this year */
  /* Save data and logout */
  else if( dr == DialogResult.Yes ){
    /* Write data and tell the event handler to not cancel the logout */
    this.WriteCacheToFile();
    e.Cancel = false;
  }
  /* Bad user! doesn't care about poor data */
  else if( dr == DialogResult.No ){
    e.Cancel = false;
    return;
  } 
}
In a real world application, the data cache might actually be fairly large if disk IO is a latency concern. Hence, we handle the LowMemory event as well. To handle this event, we simply write our cached data to the disk, in hopes of alleviating the burden on the process working set and therefore the system RAM.
private void SystemEvents_LowMemory(object sender, EventArgs e) {
  /* Don't care if user logs out while no logging going on */
  if( logThread == null ) return; 
  /* System is low on memory, write to file. */
  this.WriteCacheToFile(); 
}
Another concern to an application developer is that of the system in standby or suspend mode. In this mode, the system state is saved and the computer is placed in a power save mode. This is IMHO the most dangerous scenario, for people often forget whether the system is in standby or off. This poses a potential for unsaved data to be lost. To handle this case, we handle the PowerModeChanged event. This event provides information whether the power mode is being resumed, suspended, or simply changed (as in laptop battery etc.). Since this event provides no means for cancellation, we simply write out our cache data in case the system should fail to recover from standby properly.
private void SystemEvents_PowerModeChanged(object sender, 
                        PowerModeChangedEventArgs e) {
  /* User is putting the system into standby */
  /* Cannot cancel the operation, write cached data */
  if( e.Mode == PowerModes.Suspend ){
    this.WriteCacheToFile();
  } 
}
The final concern is that the user closes the application while it's running. Though this has been handled by many in the Form's Closing event, it has been highly unreliable and problematic. I hence use the ApplicationExit event of the application class that signals that the application is about to terminate. (See Notes below.)
private void Application_ApplicationExit(object sender, EventArgs e) {
  /* Application is about to exit, cleanup and write data */
  this.Cleanup(); 
}

Note 1:

When handling the SessionEnding event, though the user is prompted with a choice, there is a time limit. The operating system will give the application time to die or kill it forcefully. The example presented here was just to suggest the options available. However, in a real world application, one would most likely cancel the logout, or write data and proceed without giving the spoiled user a clue.

Note 2:

Windows XP supports multiple users logged into the same machine. In this scenario, user A can switch users while programs are still running. The SessionEnding event is not fired when a user remains logged on and temporarily switches to another user. This is important! If user A switches to user B and then user B shuts the system down, user A will not have the ability to react to any message boxes running in user A's process space.

Note 3:

There is nothing a process can do to prevent itself from being killed by the task manager or lower level API. This signal is low level and cannot be handled by any .NET mechanism. When you think about it, this makes sense, though it is a power struggle between the developer and the OS.

Note 4:

I tried looking into the exact purpose of the EventsThreadShutdown event. It would seem to me that it was implemented to prevent the application from terminating a thread waiting for the SessionEnding event. I tried to get this event to fire but couldn’t. I also could not locate any documentation on MSDN or otherwise that would provide more info. If anyone has too much spare time to figure this out, I'd love feedback on this issue.

TortoiseSVN覆盖图标神秘消逝案


近日,突然发现,TortoiseSVN的几个覆盖图标消息了,包括:忽略图标、未版本化图标。奇怪,好端端的覆盖图标为什么会消失呢?为什么只有这两个图标消失呢,而别的覆盖图标(如:已版本化图标、已修改图标、新增图标等)都还好端端的呢?
开始以为是TortoiseSVN坏了,于是重装,但结果还是一样。于是找了好多资料,终于发现症结所在--原来是Windows对覆盖图标类型的数据限制的原因。Windows最多只允许15个覆盖图标,它自己又用了几个,结果给用户用的就11个左右了(这个限制一直都Windows 7都没有放宽,真不知微软是怎么想的)。TortoiseSVN标准会使用7个(普通图标、已修改图标、冲突指示图标、已删除图标、新增文件图标、忽略图标、未版本化图标等),这样剩下可用的就少之又少了。如果再安装了网盘软件(如:快盘,Dropbox等),那就更惨了,它们各自又会使用3个左右的覆盖图标,这样,覆盖图标当然远远不够用了。
那么,覆盖图标的设置保存在Windows的哪个地方呢?如果有超过11个的覆盖图标,Windows如何选择显示哪些屏蔽哪些呢?下面继续…
所有应用程序的覆盖图标都需要在注册表“HKEY_LOCAL_MACHINE\SOFTWARE\Microsoft\Windows\CurrentVersion\Explorer\ShellIconOverlayIdentifiers”下面增加一个项目,当需要显示覆盖图标时,Windows会按照项目名称的字母顺利依次查询在这些项目里所指示的接口,以检测是否有覆盖图标,当检测到11个有效的接口后,Windows就会自动停止继续向下检测,这样,后来的覆盖图标就不会显示了。
知道原理了,解决问题就好办了。我们可以分析一下在这个注册表项下的所有项目,看哪些覆盖图标是需要的,哪些是不需要的,把不需要的项目的名称改一下,前面加个“z”,这样,这个表项按字母排序就自动排到最后面了。哪些是不需要的呢?比如:网盘的“正在同步图标”就没什么用,可以去掉。其它的,可以自己看着办了。
如果你进行调整后,把TortoiseSVN的所有覆盖图标全部提前,但TortoiseSVN仍然不会显示忽略图标、未版本化图标。为什么呢?研究了TortoiseSVN的源代码才发现,原来TortoiseSVN会自己分析在ShellIconOverlayIdentifiers中注册的覆盖图标数,如果注册了太多,TortoiseSVN会自动屏蔽一些无关紧要的图标,目的是让别人软件的覆盖图标尽可能有机会显示。也就是说,如果你希望,显示TortoiseSVN的这些它自己认为“无关紧要”的覆盖图标,你需要删除一些别的程序的图标,把覆盖图标的总数减小到13个以下,这时,TortoiseSVN才会正常显示忽略图标、未版本化图标等无关紧要的图标。